Press “Settings” + “Home” buttons more than 2 seconds. Use code 1995 to set Demo Mode On/Off
Control Luxtronik Heatpump with Fibaro
Requirements
- Fibaro HC2
- Heat pump with Luxtronik II Heating & Heat pump control with firmware lower than 3.81
- Web server (PHP enabled)
Luxtronik II
Luxtronik II is a heating and heat pump control which can be found in various heat pump systems:
- CTA (Switzerland)
- alpha innotec
- Novelan
- Wolf
Mine has firmware version 1.76 which runs a Java Web interface.
Make sure to configure a fixed IP address or reserve an IP address for it on your Router/DHCP server and you are able to access it (use Internet Explorer because of Java issues with Chrome).

Web server
The Web server is required as interface between the Java Web interface of Luxtronik and the Fibaro system. Make sure to use a fixed IP address for your Web Server!
Create a sub folder on your Web server in the web directory and name it heating. On my Linux server the path is: /var/www/html/heating
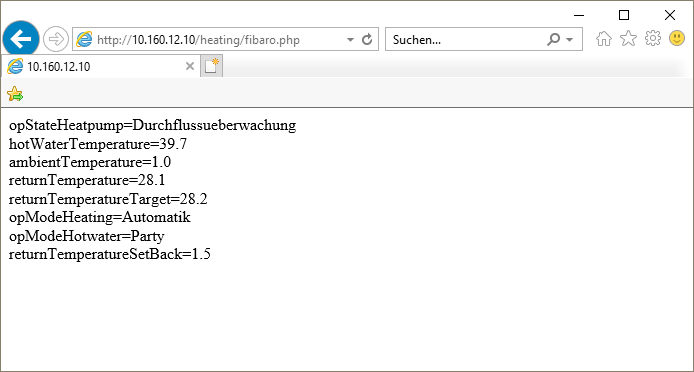
Download the file fibaro.php and change the IP address and eventually the port (try 8888 if 8889 is not working) in the configuration part of the file:

Open the file in your Web Browser to check if data of your heat pump is gathered: http://IPADDRESS/heating/fibaro.php
Fibaro Virtual Device
Configure the virtual device
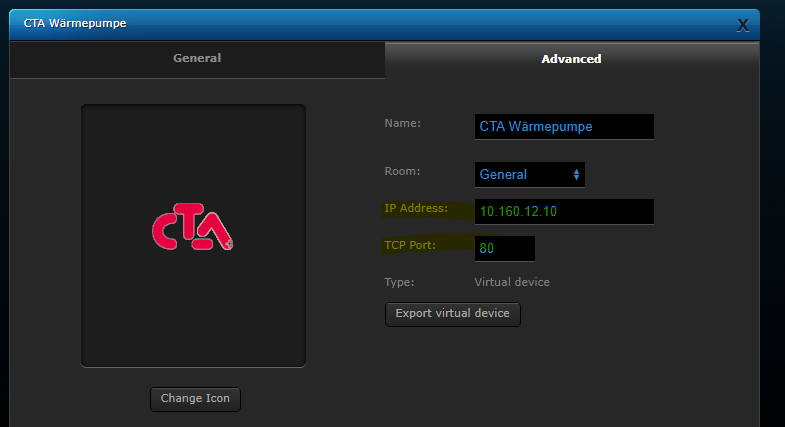
Download the Virtual Device and add it to your Fibaro HC2: Download
Change the IP address in the configuration to the IP address and port of your Web Server:
Use the virtual device
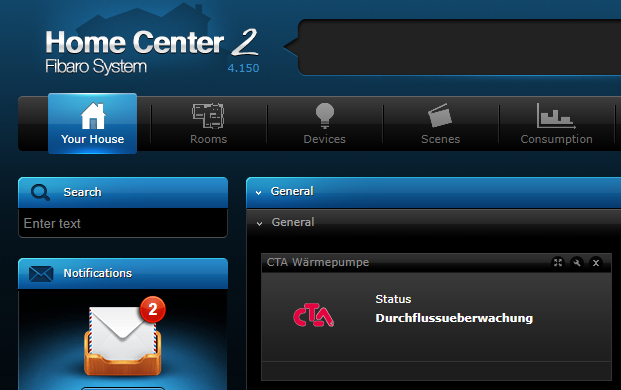
In the overview of the device you are able to see the current status:
The following control options are currently implemented:
Control your Boiler
Auto: Normal mode
Party: Heats up boiler to 50°, then sets mode automatically to Auto
Aus: Turn off
Control your Heating
Auto: Normal mode
Party: Always on
Aus: Turn off
Temp set back: Adjust your temperature by +0.5° and -0.5°

Thank you
I found a lot of information on the following web sites:
http://www.loxwiki.eu/display/LOX/Luxtronik+2
https://github.com/waja/alpha-innotec-stats
https://github.com/mhop/fhem-mirror/blob/master/fhem/FHEM/23_LUXTRONIK2.pm
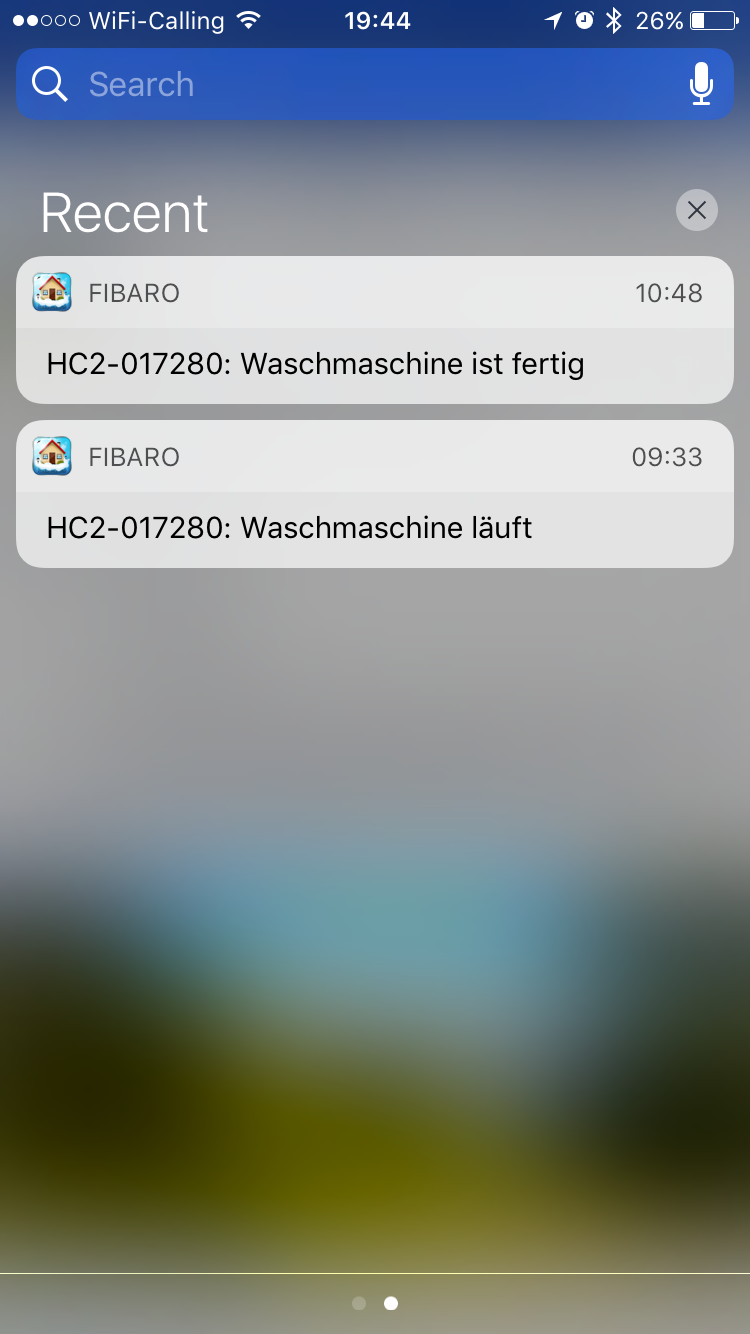
Washing machine push notification scene

The washing machine is in the cellar and laundry will be forgotten inside… At least one reason for me to create a scene which sends a push notification when the washing machine runs and when it’s finished.
The only thing you need, is a Z-Wave plug which can handle power peaks of your appliance. I use a Plug from Fibaro:

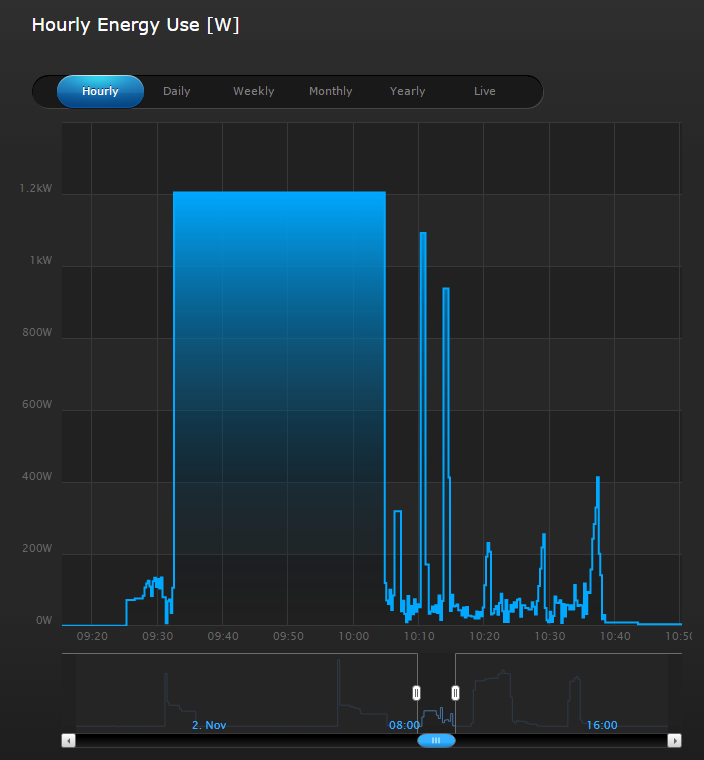
How can we detect a running or finished state? As seen on the picture below a wash cycle has some peaks and troughs which fall down to neraly zero. Therfore a scene must ignore those ups and downs. This can be achieved by using the last modification value on a device.
Using a loop which requests power usage data from the plug every 20 seconds resulted in using a global variable for the current state of the washing machine.
- Off: currently not used (maybe for future use)
- On: When plug is turned on, but Washing machine not running
- Running: When a wash cycle is running

The scene:
--[[
%% autostart
%% properties
50 power
%% globals
Waschmaschine
--]]

PlugID = 50;   -- Plug ID
Phone1 = 525;  -- ID Phone 1
Phone2 = 445;  -- ID Phone 2


-- Only allow one instance of the current scene to run at a time
if (fibaro:countScenes() > 1) then
  fibaro:abort()
  fibaro:debug('Scene runs already. Killing...');
end


local Wallplug =  (tonumber(fibaro:getValue(PlugID, "value")) > 0 ); -- Ist Wallplug an
if (Wallplug)
    then
      while true do

fibaro:debug('Start LUA...');
local tempDeviceState0, deviceLastModification0 = fibaro:get(PlugID, "power");
fibaro:debug('Last modification: ' .. deviceLastModification0);

fibaro:debug('Waschmaschine Check ob fertig...');
if (( tonumber(fibaro:getValue(PlugID, "power")) < 10 ) and (os.time() - deviceLastModification0) >= 300) then
  	if
 		( fibaro:getGlobalValue("Waschmaschine") == "Running" )
	then
                fibaro:debug('Waschmaschine läuft noch...');
    	fibaro:debug('Waschmaschine is ON');
        fibaro:call(Phone1, "sendPush", "Waschmaschine ist fertig"); -- Push Handy
        fibaro:call(Phone2, "sendPush", "Waschmaschine ist fertig"); -- Push Handy
		fibaro:setGlobal("Waschmaschine", "On");
	end
end

fibaro:debug('Waschmaschine Check ob läuft...');
if
 		( fibaro:getGlobalValue("Waschmaschine") ~= "Running" )
	then
	    	fibaro:debug('Variable ist nicht gleich RUNNING');
if (( tonumber(fibaro:getValue(PlugID, "power")) > 10 ) and (os.time() - deviceLastModification0) >= 60) then
	    	fibaro:debug('Waschmaschine is RUNNING');
            fibaro:call(Phone1, "sendPush", "Waschmaschine läuft"); -- Push Handy
            fibaro:call(Phone2, "sendPush", "Waschmaschine läuft"); -- Push Handy
            fibaro:setGlobal("Waschmaschine", "Running");
end
      end
    fibaro:sleep(20000);
      end
   end
Use round icons in Fibaro HC2
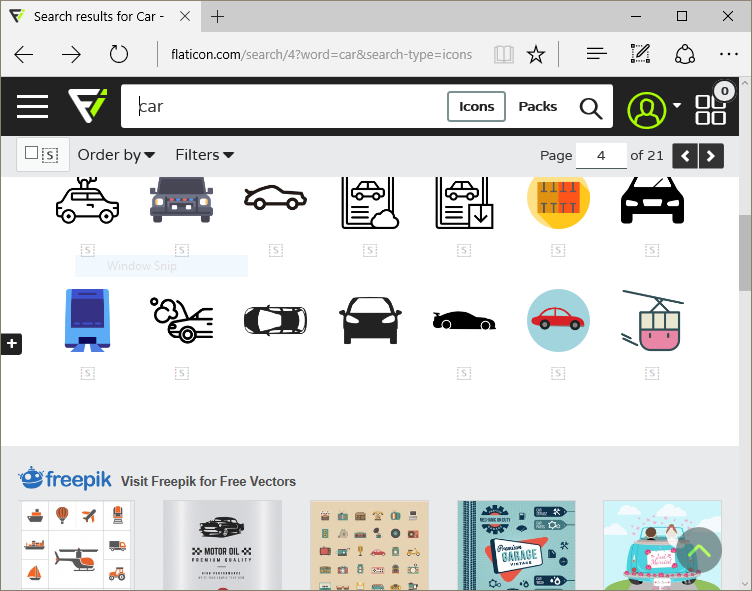
After two years of using flat icons for my rooms in my Fibaro HC2, I decided to try a different look. After searching for some nice icons, I found some round icons on http://www.flaticon.com/.


Go to http://www.flaticon.com/ and search for “car” for example:
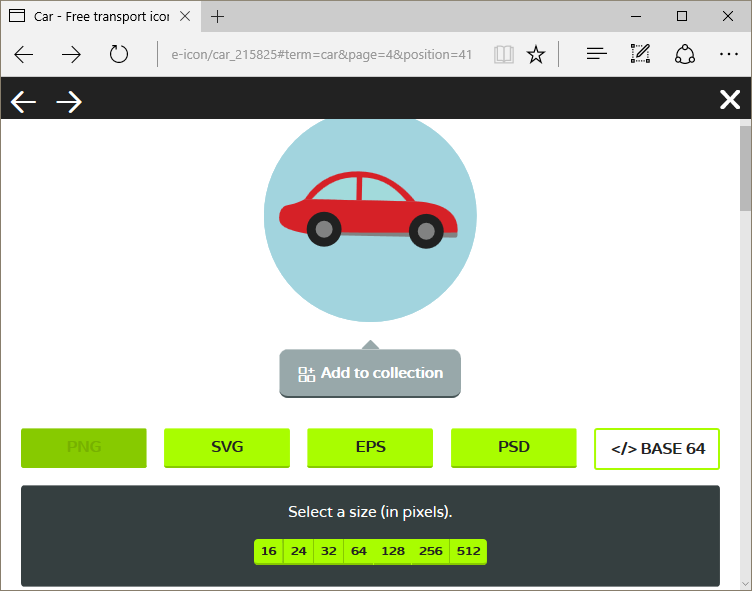
Choose PNG and select as size 128:
Now click on Free download:

Upload the icon in your Home Center 2 as room icon:

MyLights VirtualDevice
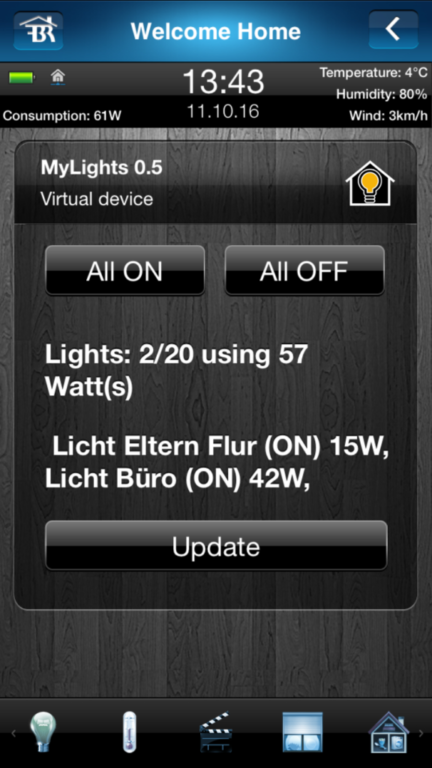
My first Virtual Device for Fibaro. Somehow useless, but it shows how a Virtual Device works.
The device checks the status, calculates the watt usage and it’s possible to turn on or off all lights.
Automower hidden menu

Toolbox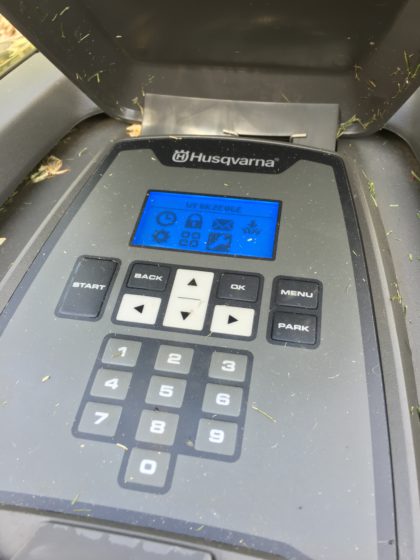
Besides the main menu options in the Manual for Automower are described , the tools/toolbox option is also available. The hidden menu provides you the possibility to test components of the mower and retrieve various operating data.
activate menu
1. Call up the main menu
2. Hold the number keys 7 and 9 simultaneously for 2 seconds
Hide menu
Option 1:
The Tools menu will be hidden when the main switch is turned off and on the next time.
Option 2:
1. Call up the main menu 2. Hold the number keys 7 and 9 simultaneously pressed. Then just the text appears standard Mode. Now, the main menu only the four Standard options available
Extended menu
For example necessary for adjusting the gardenshape.
Hold down “0” for 2 seconds
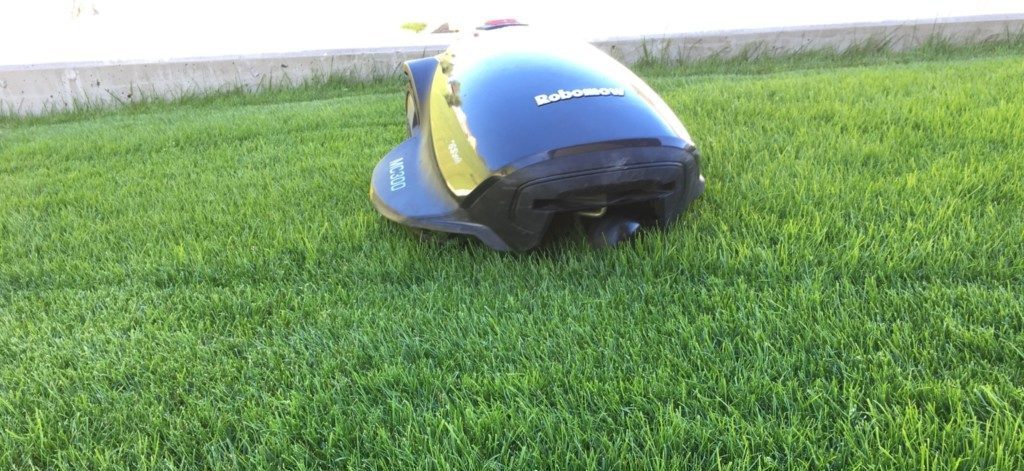
Robomow with defective drive unit
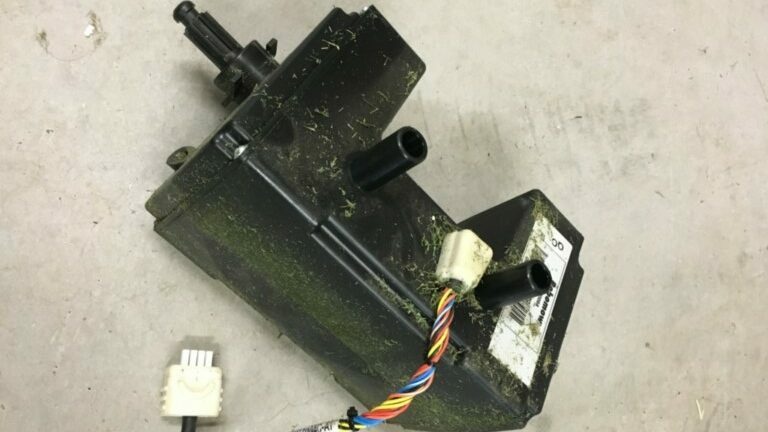
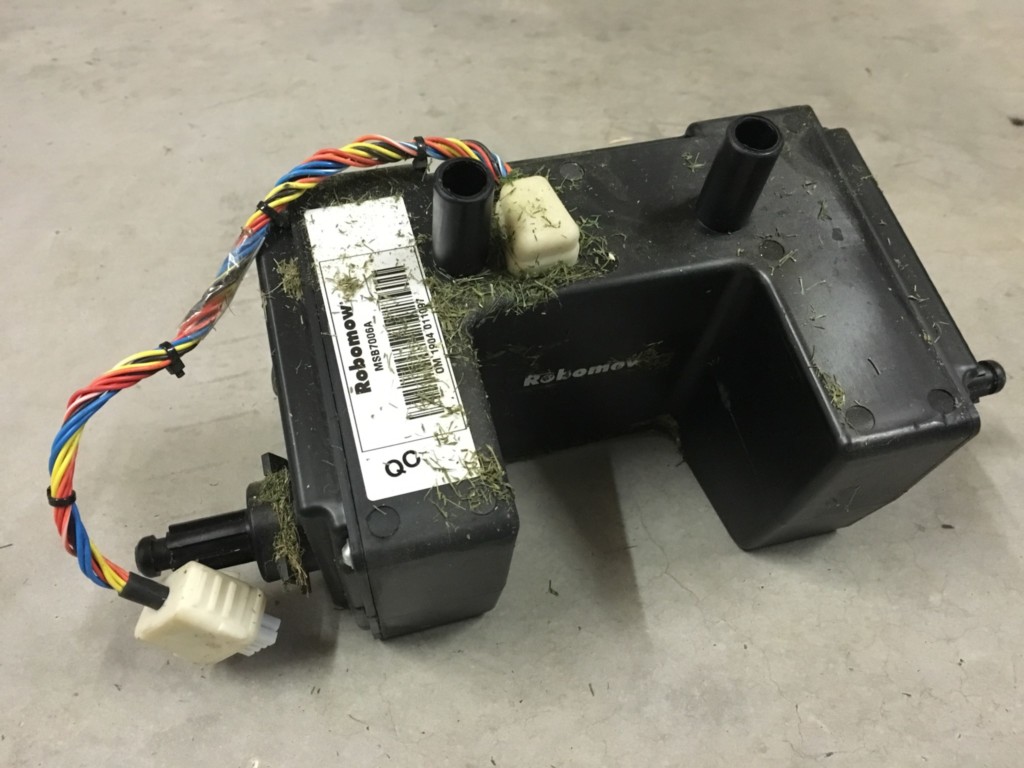 I had an issue with my MC300. One day, the mower was outside of the lawn. After putting it back and starting the program manually it went again directly outside the lawn. After checking the wheels (spin the wheels manually), one of them was overrunning. After calling Robomow Support, they sent me a replacement unit for the defect part. The replacement is quite easy and done within 5 minutes:
- Turn off Robomow
- Remove the wheels (screwdriver)
- Remove the battery pack
- Replace the unit
- Mount battery pack and wheels
Copy group membership from a user to another in Active Directory
Save membership of source user into a variable:
$CopyUser = Get-ADUser HansMuster -prop MemberOf
Save membership of target user into a variable:
$CopyToUser = Get-ADUser SeppMuster-prop MemberOf
Copy group membership:
$CopyUser.MemberOf | Where{$CopyToUser.MemberOf -notcontains $_} | Add-ADGroupMember -Member $CopyToUser